Advanced Engraving Techniques: Creating Cut-Out Shapes | Resources
Welcome to the JPPlus Resource Center!
Your resource for support for: Engraving | Sublimation | Toner Heat-Transfer | UV-LED & more!

APPLICATION
The first thing you need to realize is that cutting out shapes, name badges or letters is as easy as first-surface rotary engraving. The only significant differences are that you may need to slow down the table speed and select a different cutter for the job. Most people have not been shown a process that makes this easy, but here's a way that works every time. I recommend this method for cutting out 1/32", 1/16" and 1/8" materials. Thicker material may require some special consideration, which will be discussed later. If you've never considered offering name badges with unique shapes, pet-tags, luggage tags or geometric shapes, now is the time!
TOOLS
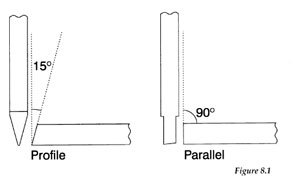
Determine what kind of finished look you want for the cut-out object. Many times a beveled edge is desired because it "picture frames" the shape. I think this looks especially great on name badges. The cutter of choice may be a profile cutter with a fairly steep angle, say about 15°. On the other hand, if I'm doing a cut-out of a state shape with plenty of detail, I may choose a parallel cutter, which leaves a straight 90° edge. Figure 8.1 shows the cutter shape and expected finished look.

NOTE: It is possible to cut-out a badge or shape with a traditional flexible engraving stock cutter, the same one used to do the engraving. The only issue is that the size of the cutter tip and geometry may not yield the best cut-out results. A standard cutter for flexible engraving stock produces a 30° bevel.
If you've never ordered a parallel cutter before, consider the following: Tell the supplier how deep you plan to cut or what the material thickness is. This will keep the cutter tip length to the minimum required to get through the material while insuring cutter strength. I never recommend a parallel cutter tip width of less than .060". Even when cutting thin materials, reducing the tip width will compromise cutter strength.
If you are buying a profile cutter, a 15° angle with a .015" tip width is generally okay. Any smaller tip and you are likely to break it. A reason why a small tip width is preferred is that this cutter is used to cut out ADA compliant letters and a smaller tip will not gather the nasty adhesive that accompanies the ADA material.
TECHNIQUE
Step One: Prepare the engraving table.
One reason that many people hate to do cut-outs is that they dislike the cleanup of the engraving area and the cleanup of the cut-out shape. They also fear cutting into their engraving table. I recommend cutting into the engraving table at least once. This will remove the fear and any future possibility of embarrassment. (If possible, engrave someone else’s name on the table other than your own.)
Start by placing a sacrificial piece of engraving stock on the table. Secure this with a good adhesive. Cover the entire engraving table if you plan to do large sheets of material. Any material will do including 1/32", 1/16", 1/8", etc. You will be able to use this material as a sacrificial surface many times so don’t get hung up on the expense. Pick an old piece of stock that's not a great seller, like hot pink over a fluorescent green. Or, maybe you keep some larger engraving mistakes around. Place the sheet face down and use the back as the surface to mount your cut-out material.
Step Two: Prepare the material to be cut.
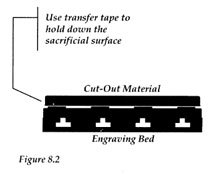
Here's the key to the whole process. Regardless of the material you want to cut, you need to hold the cut-out object in place at all times. Most people would put a considerable amount of tape on the back of the sheet to be cut. They may miss placing tape directly under the cutout area and the part may move during engraving. What you need is a popular material used by vinyl sign-makers. It's called transfer tape. A sign-maker uses this tape to lift and place the vinyl image on a sign or banner. It has a low tack adhesive and leaves no residue. It can be purchased from almost any vinyl supplier in roll form. 12" wide works well since most engravers purchase their stock in 12" x 24" sheets. (See Figure 8.2.)

Place the transfer tape on the back of the cut-out sheet. Using just a few strips of double-sided tape, stick the sheet to the sacrificial surface. When you cut through the top material into the sacrificial piece beneath, the cut-out shape will not easily move, and, most importantly, when you peel off the transfer tape from the back of the cutout, no tape residue will need to be cleaned up.
Step Three: Set-up the spindle.
If there’s one thing that usually stumps the engraver, it’s setting up the spindle properly to cut all the way through the material. The optimum cut would be just through the material but not through the transfer tape. This is easily achieved by zeroing the cutter. Refer back to the Proper Depth Control section in Chapter 5 if you need to remember how this is done.
Step Four: Cut-out the shapes.
Most software will allow you to do the engraving on each piece before doing a cut-out operation. If and when possible, do the engraving first. You can predict the results and know that the orientation of the engraving to the shape is proper. This will not always be possible if the shapes are going to be cut and used at a later date. Additionally, holding or fixturing odd shapes later can be difficult.
To save some of the secondary operations like adding ring holes, etc., consider doing these steps before cutting out. It’s always easier to let the machine do the work for you. A cutter change may be necessary to add holes. Sometimes you can do it with the profile or parallel cutter already in place. It all depends on the look you want.
A simple rule of thumb when cutting out flexible material is to increase the cutter rpm and decrease the table speed. You're taking a lot more material and you'll need to slow it down a bit.
Step Five: Remove the cut-out pieces.
Simply lift the entire sheet of material off the sacrificial surface. You can weed out the undesirable material and remove the cutouts. If you add a couple of strips of tape to the sacrificial surface, you can usually set up the next job. After several plate changes you will need to put down a new sacrificial or at a minimum pull a little maintenance on the surface. Over time you will get some tape build-up which will need to be removed.
The Engravers' Bible © 1999 by Rich Zydonik/National Business Media, Inc. Printed and Bound in the United States of America. All rights reserved. No part of this self-study manual may be reproduced in any form without permission in writing from the author/publisher. Additional legal, financial and professional management advice and/or assistance are encouraged.
